Difference between revisions of "POP Kiosk Foot (part)"
| Line 1: | Line 1: | ||
{{DocumentationPage}}{{NeedsDemonstration}} | {{DocumentationPage}}{{NeedsDemonstration}} | ||
==Overview== | ==Overview== | ||
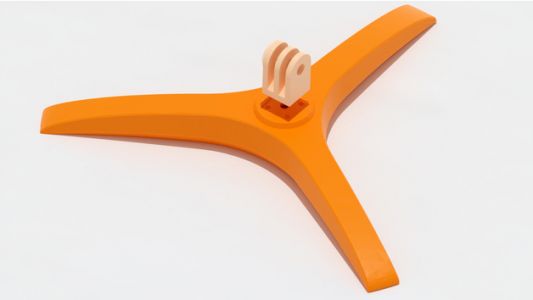
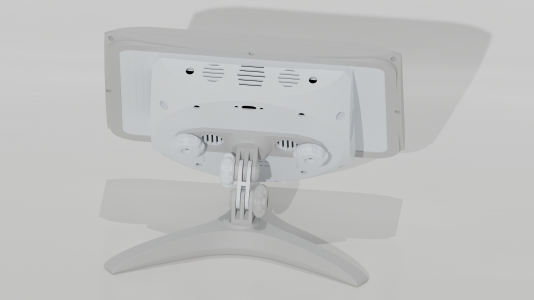
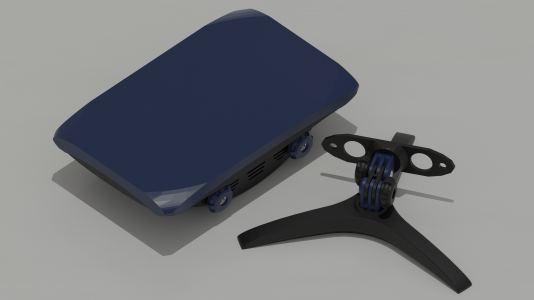
The foot is used to display the kiosk on a flat surface, such as a table or shelf. It is printed in two parts then attached together with an M4 bolt and optional glue. The foot can be used with a two- or three-prong adapter. The foot can be used with suction cups to more securely attach to sheer surfaces, such as glass or polished stone. Additionally, 3D printed TPU or third-party anti-slip grips can be attached to the bottom. | <gallery mode="packed" heights="200"> | ||
File:Foot.jpg|alt=Kiosk Foot | |||
File:POP Kiosk with Foot on Back.png|alt=Kiosk with Foot on Back | |||
File:POP Kiosk Disassembled.png|alt=Kiosk Disassembled | |||
</gallery>The foot is used to display the kiosk on a flat surface, such as a table or shelf. It is printed in two parts then attached together with an M4 bolt and optional glue. The foot can be used with a two- or three-prong adapter. The foot can be used with suction cups to more securely attach to sheer surfaces, such as glass or polished stone. Additionally, 3D printed TPU or third-party anti-slip grips can be attached to the bottom. | |||
==Features== | ==Features== | ||
* Prints in two parts to improve long term durability | * Prints in two parts to improve long term durability | ||
Revision as of 17:43, 2 March 2023
Overview
The foot is used to display the kiosk on a flat surface, such as a table or shelf. It is printed in two parts then attached together with an M4 bolt and optional glue. The foot can be used with a two- or three-prong adapter. The foot can be used with suction cups to more securely attach to sheer surfaces, such as glass or polished stone. Additionally, 3D printed TPU or third-party anti-slip grips can be attached to the bottom.
Features
- Prints in two parts to improve long term durability
- Can be used to attach two-prong ("male") or three-prong ("female") Modular Mounting System accessories.
- Can be used with M5 screw-on suction cups or 3D printed TPU anti-slip grips
Specifications
Dimensions
The kiosk foot measures 189.22mm x 164.92mm x 21.74mm.
Printed Parts
| Part | Description | Quantity | Estimates | Example | |
|---|---|---|---|---|---|
| Print Time | Filament Usage | ||||
| Kiosk Foot | Provides a stable base on flat surfaces | 1 | 7 hours 26 minutes | 63g | |
| Modular Mount Head – Two-Prong | Head for the mount plate that can be used to attach two-prong ("male") accessories. | 1 | 54 minutes | 6g | |
| Modular Mount Head – Three-Prong | Head for the mount plate that can be used to attach three-prong ("female") accessories. | 1 hours 3 minutes | 7g | ||
Hardware
| Part | Description | Quantity |
|---|---|---|
| M4-10mm machine screw | Attaches the kiosk foot to the modular mount head | 1 |
| M5-5mm suction cups | Suction cups can provide additional stability on sheer surfaces. | 3 |
Material
This part is printed with polylactic acid (PLA) or other sturdy plastic, such as Polypropylene (PP) or Acrylonitrile styrene acrylate (ASA).
Printing This Part
Slicing
Orientation
| Part | Notes | Example |
|---|---|---|
| Kiosk Foot | We recommend printing this part with the bottom of the foot touching the build plate. | |
| Modular Mount Head – Two-Prong | We recommend printing this part with the prongs parallel to the build plate. | |
| Modular Mount Head – Three-Prong | We recommend printing this part with the prongs parallel to the build plate and the rounded edge pointed up. |
Settings
Kiosk Foot
We start with the default "Standard Quality" 0.2 mm print profile. We recommend the following settings overrides:
| Setting | Recommendation | Notes |
|---|---|---|
| Shell - Wall Line Count | 4 | This was increased from the default to increase the durability when higher amounts of stress are applied. |
| Shell - Bottom Layers | 4 | This will provide sturdy walls for each prong. |
| Shell - Top Layers | 4 | This will provide sturdy walls for each prong. |
| Infill - Density | 45 | This part supports the kiosk and the extra infill weight helps with providing a sturdy base. |
| Infill - Pattern | Tri-Hexagon
Cubic Subdivision |
These infill patterns provide good internal support in multiple directions. Tri-Hexagon uses less filament but is also less durable. |
| Speed - Print Speed | 40mm/s | For final production prints, we recommend printing slower than average to decrease stringing with small holes. |
| Support - Generate Support | No | This part has no overhangs. |
| Build Plate Adhesion - Adhesion Type | None | This part has a lot of contact with the print bed and should not require a raft. |
Modular Mount Head – Two-Prong
We start with the default "Standard Quality" 0.2 mm print profile. We recommend the following settings overrides:
| Setting | Recommendation | Notes |
|---|---|---|
| Shell - Wall Line Count | 4 | This was increased from the default to increase the durability when higher amounts of stress are applied. |
| Shell - Bottom Layers | 4 | This will provide sturdy walls for each prong. |
| Shell - Top Layers | 4 | This will provide sturdy walls for each prong. |
| Infill - Density | 45 | This part can be subject to high stress and more infill will provide greater structural integrity. |
| Infill - Pattern | Tri-Hexagon
Cubic Subdivision |
These infill patterns provide good internal support in multiple directions. Tri-Hexagon uses less filament but is also less durable. |
| Speed - Print Speed | 40mm/s | For final production prints, we recommend printing slower than average to decrease stringing with small holes. |
| Support - Generate Support | Yes | This part has a lot of overhangs that require the use of supports. |
| Support - Support Structure | Tree | We highly recommend tree supports instead of normal supports. They take more time, but they require less filament and are much easier to remove. |
| Support - Support Placement | Touching Buildplate | Only printing supports that touch the build plate are much easier to remove from this print. |
| Build Plate Adhesion - Adhesion Type | Raft | This part is small and uses a lot of supports, so it is recommended to use a raft. |
Modular Mount Head – Three-Prong
We start with the default "Standard Quality" 0.2 mm print profile. We recommend the following settings overrides:
| Setting | Recommendation | Notes |
|---|---|---|
| Shell - Wall Line Count | 4 | This was increased from the default to increase the durability when higher amounts of stress are applied. |
| Shell - Bottom Layers | 4 | This will provide sturdy walls for each prong. |
| Shell - Top Layers | 4 | This will provide sturdy walls for each prong. |
| Infill - Density | 45 | This part can be subject to high stress and more infill will provide greater structural integrity. |
| Infill - Pattern | Tri-Hexagon
Cubic Subdivision |
These infill patterns provide good internal support in multiple directions. Tri-Hexagon uses less filament but is also less durable. |
| Speed - Print Speed | 40mm/s | For final production prints, we recommend printing slower than average to decrease stringing with small holes. |
| Support - Generate Support | Yes | This part has a lot of overhangs that require the use of supports. |
| Support - Support Structure | Tree | We highly recommend tree supports instead of normal supports. They take more time, but they require less filament and are much easier to remove. |
| Support - Support Placement | Touching Buildplate | Only printing supports that touch the build plate are much easier to remove from this print. |
| Build Plate Adhesion - Adhesion Type | Raft | This part is small and uses a lot of supports, so it is recommended to use a raft. |
Results
Printers
This part has been print tested with the following 3D printers:
| Manufacturer | Model | Notes |
|---|---|---|
| Creality | CR-10 Mini | Excellent print quality. Reliable machine. |
| Creality | CR-10 | Excellent print quality. Reliable machine. |
| Creality | Ender 3 S-1 Pro |
Build Surface
This part has been print tested with the following build surfaces:
| Method | Notes |
|---|---|
| Painter's tape | |
| Glue stick | Creates an uneven and non-uniform first print layer appearance. |
| Adhesive build surface | First layer may have problems printing full height depending on type and hardness of build surface, but this does not affect the overall printability. |
| Polyetherimide (PEI) build plate | Some parts may require a raft if there are issues with the first layer adhering. |
Filament
This part has been print tested with the following materials:
| Filament | Manufacturer | Notes |
|---|---|---|
| Overture PLA | Overture | Excellent build quality and durability. Good for prototyping or production kiosks. |
| Amazon Basics PLA | Amazon | Decent build quality and durability. Recommended for rapid prototyping. |
| Documentation | |
|---|---|
| Installation | Look and Feel |
| Interaction Modes | Developing Activity Types |
| Creating an Interactive | Framework |
| Integrating CLIO | Contribute |


