POP Kiosk
Overview
The POP kiosks were built with open hardware and open-source software technologies. They are designed to have a mobile and modular form factor, allowing it to be integrated into a variety of exhibit scenarios, inside and outside of your institution.


This kiosk is a low-cost option for integrating CLIO activities into exhibits, performing user and pilot testing on a physical interactive display and generating a proof-of-concept for planning meetings. It is constructed using off-the-shelf parts and doesn't require any soldering, meaning all hardware is easily replaceable in the event of damage, failure or obsolescence. If you ever need another kiosk, they can also be easily replicated.
Purpose
We created the POP kiosks because we thought there should be a cheap and easy way for museums, libraries and cultural heritage centers to integrate digital content into their institutions. POP is mobile and modular, so it can be built into cases or moved around galleries where additional interactive interpretation is desired. You can even use them on remote pop-up exhibits. As displays move and exhibits change, they can be repurposed again and again with new interactives in different locations. When the parts get old or damage, you can repair them in-house with a 3D printer and off-the-shelf parts.
Development Process

Though the development processes were closely intertwined, POP was developed independently of the CLIO interface. CLIO was tested using a POP kiosk, but the kiosks have also been used for other purposes, such as displaying a static websites, creating a 3D printer dashboard or running a media management server.
Electronics were chosen based on their continued availability, such as the Raspberry Pi computer and the touchscreen displays. Hardware – such as cables, fans and panel mounts – was chosen based on common hardware archetypes that are used in many industries. Fasteners are all based on open hardware metric standards that are easy to purchase from most hardware stores.
The cases and accessories were iteratively designed using rapid prototyping principles to include and refine features. We created an adapter for the Modular Mounting system, which is an mounting system designed for light objects that was released under a permissive license. This system provides a suite of arms, feet, adapters and community-created add-ons called "remixes".
Technology
Fabrication
Printer
For this project, we used a Creality CR-10 Mini 3D printer. It is a consumer-grade, entry-level 3D printer for both amateurs and professionals. It uses the Fusion Deposition Modeling technique of printing that fuses extruded filament together, layer by layer, to create a three-dimensional object.
This entry-level 3D printer cost around $350 and is an excellent investment for anyone who is new to 3D printing. The underlying source code powering this printer is open-source, allowing advanced users to tweak, alter and upgrade their printer with available open-source add-ons and expansion packs.
Filament
For the prototype kiosk, we used two different types of printer filaments to fulfill different needs. We used a Polycarbonate filament to print the rigid case and mount accessories, as well as a flexible TPU for anti-slip grips. Polycarbonate was chosen for its recyclability, durability and fatigue resistance. TPU was chosen for its combination of flexibility, oil resistance and abrasion resistance.
Hardware
Computer
The Raspberry Pi single-board computer was specifically picked for several reasons. The Raspberry Pi Foundation, who create and maintain the Raspberry Pi computer, are a non-profit organization who offer coding lessons to schools. Owing to their open-source nature, the Raspberry Pi computer has undergone rigorous testing through the Foundation, as well as the open-source community, industrial partners and the consumer markets. These systems are still extremely affordable, ranging from $5 to $55 based on the included features.
An important consideration was the long-term feasibility and maintainability of the computer. The Raspberry Pi Foundation was one of the first single-board computers available on the consumer market and, while there are now many alternatives, they have proven their stability throughout the technological boom surrounding the Internet of Things, both as a product and an institution.
Our prototype kiosk is powered by a Raspberry Pi 4B, which is considered the flagship model of the Raspberry Pi. It includes a 64-bit quad-core processor running at 1.5GHz, with metal heatsink and 2GB of RAM. This allows the CLIO interface to run smoothly with all of the included activity types. It has a unit cost of $45. The Raspberry Pi 3B+ computer is a previous generation model and approximately a third as powerful as the Raspberry Pi 4B. The Model 3B+ has been tested to be a viable solution for use with a touchscreen while having minimal interface lag and adequate heat management.
Both models are available and fully supported by the Raspberry Pi Foundation. Due to the many different technical applications and customers using the product, the Raspberry Pi Foundation has stated that both models will remain in production until at least January 2026[1].
Touchscreen
For the CLIO kiosks, we decided to use the official Raspberry Pi 7” touchscreen display. It has guaranteed out-of-box support with the Raspberry Pi when used with the official Raspbian operating system, as well as many other distributions of Linux.
The official Raspberry Pi display receives its signal directly through a special DSI (Digital Serial Interface) cable connected to the Raspberry Pi computer. This port decreases the overall footprint by removing the use of a bulky HDMI cable and USB cable for touch input. This allowed us to create a more compact, self-enclosed kiosk system. We have chosen to power the display through the GPIO (General-Purpose Input and Output) port, but the display can also be powered through a MicroUSB cable should you need the GPIO port for other add-ons, such as a HAT (Hardware Attached on Top).
The display is made from glass and have a ten-finger multitouch screen, while most other affordable displays are plastic with a one-finger resistive screen. This creates a more versatile experience. The glass screen lends to a pleasant and more familiar usage experience, while also allowing for easier cleaning with a disposable sanitary wipe.
While the Raspberry Pi Foundation has made no official obsolescence statement guaranteeing the production of this product, it has been available on the market and supported since 2015.
Storage
We use a Micro SDHC card with a minimum of 16GB storage space and speed of UHS-I/Class 10.
Power Supply
For the POP 7" kiosk, we use the Canakit USB-C Raspberry Pi 4 power supply with additional overhead power (5.1V vs 5V) and increased amperage (3.5A vs 3.0A). All USB cables are at least 20AWG to help alleviate voltage drops.
Software
Operating System
A primary objective of CLIO was keeping as much as we could open-source. This increases community involvement, deepens available resources, decreases licensing fees, and helps to ensure the continued development of other projects like it. We have chosen to use a Debian-based Linux operating system called Raspberry Pi OS Lite. This is the official Raspberry Pi Operating System without a desktop Graphical User Interface.
Web Server
We used the Apache2 HTTP web server.
Web Browser
We used the open-source Chromium web browser. This browser is the foundation of the wildly popular Google Chrome. Chromium maintains the major features of Google Chrome, but does not contain any direct integration into Google’s services. We chose this browser because it has innate support for a kiosk-mode that disables access to the operating system. It also provides a collection of useful command line configuration options.
Printed Parts
The POP kiosk is made from a collection of modular parts that can be printed separately and assembled into different configurations based on your specific needs and application.
Case
POP 7" Kiosk
Case
Maintenance Panel

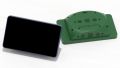
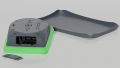
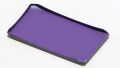
This is the main case that protects the Raspberry Pi computer and Raspberry Pi Official 7" touchscreen display. It attaches directly to the four screw holes on the Raspberry Pi official display using M3 screws. This case has an integrated 75x75mm VESA-compliant M4 mount holes. It can also be used with a 3D-printed mount attachment that can attach to the back, top or bottom side of the case. This attachment is compatible with the popular Modular Mounting System[2]. We include a C-clamp, durable foot and 3D printer frame attachment. There is a maintenance port that allows access to the USB and ethernet ports. There are holes for panel mounting a USB-C slot to reduce wear on the Raspberry Pi itself. There is an optional 30mm fan to keep the kiosk cool during operation, as well as plenty of air vents.
Protection
Collar
Collar

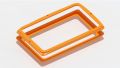
The collar protects the exposed edges of the Raspberry Pi touchscreen display, decreasing the chances that the kiosk screen will be damaged from minor bumps and falls. It is printed in two parts and held together by M2 screws.
Bumper
Bumper

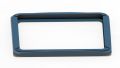
The bumper also protects the exposed edges of display, but it is printed as one part with a soft and flexible TPU filament. When printed with specific infill settings, it can provide additional protection to bumps and falls. This bumper is used instead of the collar and was created for use in mobile pop-up exhibits.
Cover
Cover

The cover provides protection to the front of the kiosk display by attaching directly to the collar or bumper. This cover was created to provide protection to the glass screen during transport and storage. Attaching foam to the cover is optional but will provide additional impact protection.
Mount
Modular Case Adapter
Modular Mount Adapter

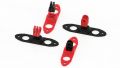
This adapter is attached to the back, top or bottom of the kiosk using two M5 bolts. It can be used with any accessories created for the popular Modular Mounting System[2]. It is printed in two parts and attached together with an M5 bolt and optional glue. The mount can be used with a two- or three-prong adapter. It can be used with the prong adapters in either a horizontal or vertical position.
Foot
Foot

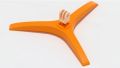
The foot is used to display the kiosk on a flat surface, such as a table or shelf. It is printed in two parts then attached together with an M5 bolt and optional glue. The foot can be used with a two- or three-prong adapter. The foot can be used with suction cups to more securely attach to sheer surfaces, such as glass or polished stone. Additionally, 3D printed TPU or third-party anti-slip grips can be attached to the bottom.
Thumbscrews
Thumbscrew

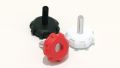
The thumbscrews are used with standard M5 bolts to make it easier to tighten and loosen the display for repositioning.
Modular Mounting System
The Modular Mounting System is designed as a support for light objects and was released under a permissive license. This system provides a suite of arms, feet, adapters and community-created add-ons called "remixes". POP is compatible with the Modular Mounting System, allowing add-ons to be attached to the top, bottom and back of the kiosk.
Creating a POP Kiosk
If you want to display your interactives in a physical space, like a gallery or as part of a pop-up exhibit, you will need a kiosk computer system. You can follow our guide to build a POP kiosk. The total per-unit build cost per kiosk is $220 for a 7" kiosk.
This low-cost and modular hardware configuration allow the kiosk to be assembled and deployed with minimal resources, while offering the flexibility, accessibility and maintainability to engage a variety of audiences in different contexts.
Customizing a POP Kiosk
The POP Kiosk comes with default settings that make it suitable for use as an embedded kiosk, but many of these settings are fully customizable. You can easily change the default resolution, display output, control wireless radios or change the boot logo.
Using a POP Kiosk
Creating a CLIO Exhibit
CLIO Exhibit is a web application graphical user interface that can be used to facilitate digital Interactives and display Activities within a gallery or pop-up exhibit. You can install CLIO Exhibit yourself into the web server content directory, or use our custom Raspberry Pi image with CLIO pre-installed.
Creating a 3D Printer Server and Dashboard
OctoPrint is a web application interface for a remotely monitoring and controlling many 3D printers. POP can be used to create a dashboard kiosk for your 3D printer that provides remote access. You can install OctoPrint yourself, or use our custom Raspberry Pi image with OctoPrint and OctoPi improvements already installed.