Difference between revisions of "Printing the POP Kiosk Case"
| (21 intermediate revisions by the same user not shown) | |||
| Line 1: | Line 1: | ||
{{ | {{DocumentationPage}} | ||
== Learn about the 3D Printing Process == | |||
We need to take the 3D object file for each kiosk part and put them into a program called a "slicer" to create instructions for our 3D printer. This process can be a little different for everyone, but here is a brief overview to get you started. | |||
{{ExternalResource|[https://all3dp.com/3d-printing-3d-printing-work/ How Does 3D Printing Work? – All3DP]}} | |||
== | == Pick Your Parts == | ||
The POP kiosk is made from a collection of modular parts that can be printed separately and assembled into different configurations based on your specific needs and application. Print and use only the parts you need and change them around at any time. | |||
===Case=== | ===Case=== | ||
<gallery> | |||
File:POP 7" Kiosk Case.jpg|alt=Case|Case | |||
This is the main case that protects the Raspberry Pi computer and touchscreen display. | File:POP Kiosk Maintenance Port.png|alt=Maintenance Panel|Maintenance Panel | ||
</gallery>This is the main case that protects the Raspberry Pi computer and touchscreen display. It attaches directly to the four screw holes on the Raspberry Pi official display using M3 screws. This case has an integrated 75x75mm VESA-compliant M4 mount holes. It can also be used with a 3D-printed mount attachment that can attach to the back, top or bottom side of the case. This attachment is compatible with the popular Modular Mounting System<ref name=":02">https://www.thingiverse.com/thing:2194278</ref>. We include a C-clamp, durable foot and 3D printer frame attachment. There is a maintenance port that allows access to the USB and ethernet ports. There are holes for panel mounting a USB-C slot to reduce wear on the Raspberry Pi itself. There is an optional 30mm fan to keep the kiosk cool during operation, as well as plenty of air vents. There is a cut-out panel for GPIO port access to control external hardware. The GPIO can also be used to add a 5W 8Ω internal speaker to the kiosk. {{Main|POP Kiosk Case (part)}} | |||
===Protection=== | ===Protection=== | ||
====Collar==== | ====Collar==== | ||
<gallery> | |||
File:POP 7" Kiosk Collar.jpg|alt=Collar|Collar | |||
The collar protects the exposed edges of the Raspberry Pi touchscreen display, decreasing the chances that the kiosk screen will be damaged from minor bumps and falls. It is printed in two parts and held together by M2 screws. | </gallery>The collar protects the exposed edges of the Raspberry Pi touchscreen display, decreasing the chances that the kiosk screen will be damaged from minor bumps and falls. It is printed in two parts and held together by M2 screws.{{Main|POP Kiosk Collar (part)}} | ||
====Bumper==== | ====Bumper==== | ||
<gallery> | |||
File:POP 7" Kiosk Bumper.jpg|alt=Bumper|Bumper | |||
The bumper also protects the exposed edges of display, but it is printed as one part with a soft and flexible TPU filament. When printed with specific infill settings, it can provide additional protection to bumps and falls. This bumper is used instead of the collar and was created for use in mobile pop-up exhibits. | </gallery>The bumper also protects the exposed edges of display, but it is printed as one part with a soft and flexible TPU filament. When printed with specific infill settings, it can provide additional protection to bumps and falls. This bumper is used instead of the collar and was created for use in mobile pop-up exhibits.{{Main|POP Kiosk Bumper (part)}} | ||
====Cover==== | ====Cover==== | ||
<gallery> | |||
File:Cover.jpg|alt=Cover|Cover | |||
The cover provides protection to the front of the kiosk display by attaching directly to the collar or bumper. This cover was created to provide protection to the glass screen during transport and storage. | </gallery>The cover provides protection to the front of the kiosk display by attaching directly to the collar or bumper. This cover was created to provide protection to the glass screen during transport and storage.{{Main|POP Kiosk Cover (part)}} | ||
===Mount=== | ===Mount=== | ||
====Modular Case Adapter==== | ====Modular Case Adapter==== | ||
{{Main|POP Kiosk Modular Case Adapter (part)}} | <gallery> | ||
File:Modular Mount Adapter.jpg|alt=Modular Mount Adapter|Modular Mount Adapter | |||
</gallery>This adapter is attached to the back, top or bottom of the kiosk using two M5 bolts. It can be used with any accessories created for the popular Modular Mounting System<ref name=":0">https://www.thingiverse.com/thing:2194278</ref>. It is printed in two parts and attached together with an M5 bolt and optional glue. The mount can be used with a two- or three-prong adapter.{{Main|POP Kiosk Modular Case Adapter (part)}} | |||
====Foot==== | |||
<gallery> | |||
File:Foot.jpg|alt=Foot|Foot | |||
</gallery>The foot is used to display the kiosk on a flat surface, such as a table or shelf. It is printed in two parts then attached together with an M5 bolt and optional glue. The foot can be used with a two- or three-prong adapter. The foot can be used with suction cups to more securely attach to sheer surfaces, such as glass or polished stone. Additionally, 3D printed TPU or third-party anti-slip grips can be attached to the bottom.{{Main|POP Kiosk Foot (part)}} | |||
==== | ====Thumbscrews==== | ||
<gallery> | |||
File:Featured preview Thumbscrew.jpg|alt=Thumbscrew | |||
</gallery>The thumbscrews are used with standard M5 bolts to make it easier to tighten and loosen accessories.{{Main|POP Kiosk Thumbscrew (part)}} | |||
{{Main|POP Kiosk | |||
The | ====Modular Mounting System==== | ||
The Modular Mounting System is designed as a support for light objects and was released under a permissive license. This system provides a suite of arms, feet, adapters and community-created add-ons called "remixes". POP is compatible with the Modular Mounting System, allowing add-ons to be attached to the top, bottom and back of the kiosk.{{ExternalResource|[https://www.thingiverse.com/thing:2194278 Modular Mounting System]}} | |||
== | == Download Your Parts == | ||
The most up-to-date POP kiosk parts can be downloaded through our Thingiverse page. | |||
{{ExternalResource|[https://www.thingiverse.com/metaphorraccoon/collections/pop-kiosk POP Kiosk – Thingiverse]}} | |||
==Next Step – Assembling the Kiosk== | |||
Once we have all the parts we need, we can start to build the final kiosk. This can including sanding and painting the kiosk case, or simply assembling all of the parts into one enclosed kiosk. Accessories can be mounted to the case using the [https://www.thingiverse.com/thing:2194278 Modular Mounting system] and quickly detached for storage.{{See|Assembling the POP Kiosk Case}} | |||
== References == | == References == | ||
<references />{{DocumentationNavigation}} | |||
Latest revision as of 13:58, 8 March 2023
Learn about the 3D Printing Process
We need to take the 3D object file for each kiosk part and put them into a program called a "slicer" to create instructions for our 3D printer. This process can be a little different for everyone, but here is a brief overview to get you started.
Pick Your Parts
The POP kiosk is made from a collection of modular parts that can be printed separately and assembled into different configurations based on your specific needs and application. Print and use only the parts you need and change them around at any time.
Case
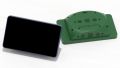
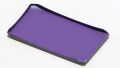
Case
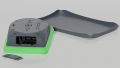
Maintenance Panel


This is the main case that protects the Raspberry Pi computer and touchscreen display. It attaches directly to the four screw holes on the Raspberry Pi official display using M3 screws. This case has an integrated 75x75mm VESA-compliant M4 mount holes. It can also be used with a 3D-printed mount attachment that can attach to the back, top or bottom side of the case. This attachment is compatible with the popular Modular Mounting System[1]. We include a C-clamp, durable foot and 3D printer frame attachment. There is a maintenance port that allows access to the USB and ethernet ports. There are holes for panel mounting a USB-C slot to reduce wear on the Raspberry Pi itself. There is an optional 30mm fan to keep the kiosk cool during operation, as well as plenty of air vents. There is a cut-out panel for GPIO port access to control external hardware. The GPIO can also be used to add a 5W 8Ω internal speaker to the kiosk.
Protection
Collar
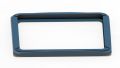
Collar

The collar protects the exposed edges of the Raspberry Pi touchscreen display, decreasing the chances that the kiosk screen will be damaged from minor bumps and falls. It is printed in two parts and held together by M2 screws.
Bumper
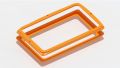
Bumper

The bumper also protects the exposed edges of display, but it is printed as one part with a soft and flexible TPU filament. When printed with specific infill settings, it can provide additional protection to bumps and falls. This bumper is used instead of the collar and was created for use in mobile pop-up exhibits.
Cover
Cover

The cover provides protection to the front of the kiosk display by attaching directly to the collar or bumper. This cover was created to provide protection to the glass screen during transport and storage.
Mount
Modular Case Adapter
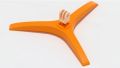
Modular Mount Adapter

This adapter is attached to the back, top or bottom of the kiosk using two M5 bolts. It can be used with any accessories created for the popular Modular Mounting System[2]. It is printed in two parts and attached together with an M5 bolt and optional glue. The mount can be used with a two- or three-prong adapter.
Foot
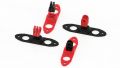
Foot

The foot is used to display the kiosk on a flat surface, such as a table or shelf. It is printed in two parts then attached together with an M5 bolt and optional glue. The foot can be used with a two- or three-prong adapter. The foot can be used with suction cups to more securely attach to sheer surfaces, such as glass or polished stone. Additionally, 3D printed TPU or third-party anti-slip grips can be attached to the bottom.
Thumbscrews

The thumbscrews are used with standard M5 bolts to make it easier to tighten and loosen accessories.
Modular Mounting System
The Modular Mounting System is designed as a support for light objects and was released under a permissive license. This system provides a suite of arms, feet, adapters and community-created add-ons called "remixes". POP is compatible with the Modular Mounting System, allowing add-ons to be attached to the top, bottom and back of the kiosk.
Download Your Parts
The most up-to-date POP kiosk parts can be downloaded through our Thingiverse page.
Next Step – Assembling the Kiosk
Once we have all the parts we need, we can start to build the final kiosk. This can including sanding and painting the kiosk case, or simply assembling all of the parts into one enclosed kiosk. Accessories can be mounted to the case using the Modular Mounting system and quickly detached for storage.
References
| Documentation | |
|---|---|
| Installation | Look and Feel |
| Interaction Modes | Developing Activity Types |
| Creating an Interactive | Framework |
| Integrating CLIO | Contribute |