Difference between revisions of "CLIO Facilitator Guide"
| (13 intermediate revisions by the same user not shown) | |||
| Line 4: | Line 4: | ||
Facilitators set up CLIO kiosks and get them working as part of an exhibit. | Facilitators set up CLIO kiosks and get them working as part of an exhibit. | ||
== | == Quick Reference == | ||
We provide a single-page, double-sided ''Getting Started Facilitator Guide'' brochure. This guide can be printed on a cardstock and folded in half to be stored with the kiosks to assist | We provide a single-page, double-sided ''Getting Started Facilitator Guide'' brochure. This guide can be printed on a cardstock and folded in half to be stored with the kiosks to assist facilitators with setup. | ||
{{Download Brochure|Download URL=https://cliomuseums.org/clio/brochure/Facilitator%20Guide.pdf}} | {{Download Brochure|Download URL=https://cliomuseums.org/clio/brochure/Facilitator%20Guide.pdf|Download Text=Facilitator's Guide}}Additionally, we provide a flashcard-sized ''Getting Started Visitor's Guide'' that can be laminated and placed nearby kiosks for use by visitors.{{Download Brochure|Download URL=https://cliomuseums.org/clio/brochure/Visitor%20Guide.pdf|Download Text=Visitor's Guide}} | ||
==Using a CLIO Exhibit Kiosk== | ==Using a CLIO Exhibit Kiosk== | ||
| Line 22: | Line 22: | ||
<gallery> | <gallery> | ||
File:CLIO Exhibit menu.png|alt=CLIO Exhibit menu | File:CLIO Exhibit menu.png|alt=CLIO Exhibit menu | ||
</gallery>The <span class="material-icons">smart_display</span>Exhibit menu lists your currently selected Activities. Resume the previously loaded activities, choose from preset collections of activities, or select entirely new ones. After selecting your activities, you can enter ‘Exhibit Mode’. | </gallery>The <span class="material-icons">smart_display</span> Exhibit menu lists your currently selected Activities. Resume the previously loaded activities, choose from preset collections of activities, or select entirely new ones. After selecting your activities, you can enter ‘Exhibit Mode’. | ||
====Facilitation==== | ====Facilitation==== | ||
| Line 29: | Line 29: | ||
File:CLIO Facilitator Discussions.png|alt=CLIO Facilitator Discussions | File:CLIO Facilitator Discussions.png|alt=CLIO Facilitator Discussions | ||
File:CLIO Discussion menu.png|alt=CLIO Discussion Menu | File:CLIO Discussion menu.png|alt=CLIO Discussion Menu | ||
</gallery> | </gallery>The <span class="material-icons">emoji_people</span> Facilitator menu provides facilitators with program information, such as goals, objectives, and facilitation instructions. Discussions can provide quick reference information about questions related to the program. | ||
====Activities==== | ====Activities==== | ||
| Line 37: | Line 37: | ||
File:CLIO Activity Preview - Selected Activity.png|alt=CLIO Activity Preview - Selected Activity | File:CLIO Activity Preview - Selected Activity.png|alt=CLIO Activity Preview - Selected Activity | ||
</gallery> | </gallery> | ||
The <span class="material-icons">dvr</span> Activities menu lets you preview Activities by tapping on them, and then select them for ‘Exhibit Mode’ by tapping the <span class="material-icons">add_circle</span> icon. Remove that Activity from Exhibit Mode by tapping the <span class="material-icons">check_box</span> icon. The Activity menu can be sorted by activity type and intended audience. | |||
====Settings==== | ====Settings==== | ||
| Line 44: | Line 44: | ||
</gallery> | </gallery> | ||
The <span class="material-icons">settings</span> Settings menu controls the Interactive- or Kiosk-specific settings. Change the display brightness, customize the theme, choose which program is loaded and troubleshoot common problems. Visitors are able to alter some of these settings, such as Themes, using the Accessibility menu. These are the default settings the kiosk will return to when it is inactive. | |||
====Accessibility==== | ====Accessibility==== | ||
<gallery> | <gallery> | ||
File:CLIO Settings menu.png|alt=CLIO Accessibility menu | File:CLIO Settings menu.png|alt=CLIO Accessibility menu | ||
</gallery> | </gallery>The <span class="material-icons">accessibility_new</span> Accessibility menu allows the current user of the kiosk to change settings to their preference, whether they are a Facilitator or Visitor. Some Accessibility options will temporarily override those found in Settings, such as Themes. When the kiosk is inactive, Accessibility options are disabled and the default Settings are loaded. | ||
====Help==== | ====Help==== | ||
| Line 55: | Line 55: | ||
File:CLIO Help menu.png|alt=CLIO Help menu | File:CLIO Help menu.png|alt=CLIO Help menu | ||
File:CLIO Help menu Getting Started.png|alt=CLIO Help menu - Getting Started | File:CLIO Help menu Getting Started.png|alt=CLIO Help menu - Getting Started | ||
</gallery> | </gallery>The <span class="material-icons">help</span> Help menu provides quick reference information about getting the kiosk set up and into Exhibit Mode. | ||
===Getting into Exhibit Mode=== | ===Getting into Exhibit Mode=== | ||
Exhibit Mode displays the selected Activities for visitors to navigate and view in Activity Mode without allowing access to hardware and exhibit settings. | Exhibit Mode displays the selected Activities for visitors to navigate and view in Activity Mode without allowing access to hardware and exhibit settings. | ||
Open the <span class="material-icons">dvr</span> Activity menu. Tap on any activity to see a preview. Return to the menu by tapping on the <span class="material-icons">home</span> Home button. | |||
While on the <span class="material-icons">dvr</span> Activity menu or in a preview, tap on <span class="material-icons">add_circle</span> to select it. Tap on the <span class="material-icons">check_box</span> to deselect it. | |||
Open the <span class="material-icons">smart_display</span> Exhibit menu and tap on the <span class="material-icons">play_circle</span> ‘Enter Exhibit Mode’ button. | |||
<gallery heights="100"> | <gallery heights="100"> | ||
File:CLIO Activity menu.png|Navigate to the Activity Menu | File:CLIO Activity menu.png|Navigate to the Activity Menu | ||
| Line 68: | Line 74: | ||
File:Nature's Networks Exhibit Mode.png|Your selected Activities are not available as a carousel. | File:Nature's Networks Exhibit Mode.png|Your selected Activities are not available as a carousel. | ||
</gallery> | </gallery> | ||
=== Returning to Facilitator Mode === | === Returning to Facilitator Mode === | ||
<gallery> | <gallery> | ||
| Line 74: | Line 81: | ||
</gallery> | </gallery> | ||
If enabled, you can use a pre-configured PIN code to return to Facilitator Mode at any time. Tapping on the bottom right corner of the Exhibit Mode carousel screen twice times will display a | If enabled, you can use a pre-configured PIN code to return to Facilitator Mode at any time. Tapping on the bottom right corner of the Exhibit Mode carousel screen twice times will display a <span class="material-icons">settings</span> Settings icon. Clinking on it will open a PIN pad. Entering the correct PIN will return you to Facilitator Mode. The default Facilitator PIN code is 2546. | ||
==Contribute== | ==Contribute== | ||
If you want to help contribute to CLIO, you've come to the right place. This is where we are trying to keep a living document based on CLIO and the way open-source technologies intersect with museums, libraries and cultural heritage centers. Sponsor us, add terms, update definitions, or provide language translations. Every little thing helps us to create a vibrant and open community geared towards one thing: equal access to technology, for everyone.{{Main|Contributing to CLIO}}{{DocumentationNavigation}} | If you want to help contribute to CLIO, you've come to the right place. This is where we are trying to keep a living document based on CLIO and the way open-source technologies intersect with museums, libraries and cultural heritage centers. Sponsor us, add terms, update definitions, or provide language translations. Every little thing helps us to create a vibrant and open community geared towards one thing: equal access to technology, for everyone.{{Main|Contributing to CLIO}}{{DocumentationNavigation}} | ||
Latest revision as of 15:47, 24 March 2023
Overview
Facilitators set up CLIO kiosks and get them working as part of an exhibit.
Quick Reference
We provide a single-page, double-sided Getting Started Facilitator Guide brochure. This guide can be printed on a cardstock and folded in half to be stored with the kiosks to assist facilitators with setup.
Additionally, we provide a flashcard-sized Getting Started Visitor's Guide that can be laminated and placed nearby kiosks for use by visitors.
Using a CLIO Exhibit Kiosk
Setting up the POP Kiosk
During storage, any mounting accessories were probably removed and the thumbscrews used to mount them were attached back to the case. First, we need to remove these thumbscrews so we can re-attach the mounting accessories. Next, orient the kiosk face down on a flat surface with the USB-C power port facing away from you. Attach the mount accessory to the bolt holes on the back or sides of the case. The mounting accessory's thumbscrews can tightened and loosened to adjust the viewing angle.

The POP Kiosk requires a 5.1V 3A power supply with a high-quality cable and USB-C adapter to perform optimally. Once plugged in, the kiosk will turn on and enter into ‘Facilitator Mode’ automatically. This interface allows facilitators to select their desired activities and change kiosk settings before entering ‘Exhibit Mode’.
'Facilitator Mode' allows facilitators to configure the exhibit kiosk, allowing for more control over how it is integrated into the pop-up environment. Facilitators can always access the menu bar, which provides access to a collection of submenus aimed at improving accessibility and live facilitation. Each icon along the top menu bar provides access to an integrated kiosk function.
Exhibit

The Exhibit menu lists your currently selected Activities. Resume the previously loaded activities, choose from preset collections of activities, or select entirely new ones. After selecting your activities, you can enter ‘Exhibit Mode’.
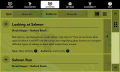
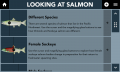
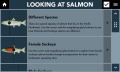
Facilitation


The Facilitator menu provides facilitators with program information, such as goals, objectives, and facilitation instructions. Discussions can provide quick reference information about questions related to the program.
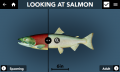
Activities


The Activities menu lets you preview Activities by tapping on them, and then select them for ‘Exhibit Mode’ by tapping the icon. Remove that Activity from Exhibit Mode by tapping the icon. The Activity menu can be sorted by activity type and intended audience.
Settings

The Settings menu controls the Interactive- or Kiosk-specific settings. Change the display brightness, customize the theme, choose which program is loaded and troubleshoot common problems. Visitors are able to alter some of these settings, such as Themes, using the Accessibility menu. These are the default settings the kiosk will return to when it is inactive.
Accessibility

The Accessibility menu allows the current user of the kiosk to change settings to their preference, whether they are a Facilitator or Visitor. Some Accessibility options will temporarily override those found in Settings, such as Themes. When the kiosk is inactive, Accessibility options are disabled and the default Settings are loaded.
Help


The Help menu provides quick reference information about getting the kiosk set up and into Exhibit Mode.
Getting into Exhibit Mode
Exhibit Mode displays the selected Activities for visitors to navigate and view in Activity Mode without allowing access to hardware and exhibit settings.
Open the Activity menu. Tap on any activity to see a preview. Return to the menu by tapping on the Home button.
While on the Activity menu or in a preview, tap on to select it. Tap on the to deselect it.
Open the Exhibit menu and tap on the ‘Enter Exhibit Mode’ button.
Navigate to the Activity Menu
Preview an Activity by tapping on it.
Add an Activity to Exhibit Mode by tapping the + icon. Tap it again to remove it.
Some Activities combine multiple Activities into one larger Activities to create new context.
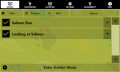
Tap Home and navigate to the Exhibit menu. Tap 'Enter Exhibit Mode'.
Confirm that you want to enter Exhibit Mode.
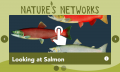
Your selected Activities are not available as a carousel.


Returning to Facilitator Mode

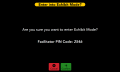
Exhibit Mode Hidden Settings Icon
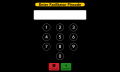
Exhibit Mode PIN Pad


If enabled, you can use a pre-configured PIN code to return to Facilitator Mode at any time. Tapping on the bottom right corner of the Exhibit Mode carousel screen twice times will display a Settings icon. Clinking on it will open a PIN pad. Entering the correct PIN will return you to Facilitator Mode. The default Facilitator PIN code is 2546.
Contribute
If you want to help contribute to CLIO, you've come to the right place. This is where we are trying to keep a living document based on CLIO and the way open-source technologies intersect with museums, libraries and cultural heritage centers. Sponsor us, add terms, update definitions, or provide language translations. Every little thing helps us to create a vibrant and open community geared towards one thing: equal access to technology, for everyone.
| Documentation | |
|---|---|
| Installation | Look and Feel |
| Interaction Modes | Developing Activity Types |
| Creating an Interactive | Framework |
| Integrating CLIO | Contribute |