Creating a Flash Card Activity
Overview
The Flash Cards activity type displays topic cards that can be flipped to view a brief description, or opened to look at a longer rich text description.
Creating the Activity
We have provided a template for the configuration file, which is used by the CLIO interface to set up the activity. We also include a content drafting template created in Microsoft Word that can aid collaboration when creating activities as part of a development team.
Define the Activity
All CLIO activities, regardless of their Activity Type, contain many of the same configuration settings. These are used to configure the screen and load the correct content. By defining this information, we can begin to draft more specific activity content. This information is included in both the drafting template and the coding template provided with each activity type. These are the most common settings:
| Setting | Description |
|---|---|
| Title | The name for the activity. |
| Description | The description for the activity shown to visitors. |
| Preview | The image displayed for the activity in Exhibit Mode. |
| Introduction Video | The video displayed under the Activity Menu to provide a video introduction to the activity. |
| Audience | Each Program can have custom audiences groups, which are included as a way to help sort activities for predefined demographics. When setting up the kiosk as part of their pop-up exhibit, facilitators have the power to configure which activities they think would best fit their audience and what they’re trying to achieve. |
| Theme | Each Activity can have a configured theme that allows each activity's aesthetic to vary slightly from the primary interface. |
| Attributions | Notifications for copyrighted content used within the activity. |
| Acknowledgements | Notifications of appreciation for content creators. |
Drafting the Content
Open the provided Content Template for drafting the Flash Card activity. First, we must decide on the basic descriptive information for the activity, such as the title, description, preview image and theme. This information is required because it is used by the CLIO interface to properly display the activity.
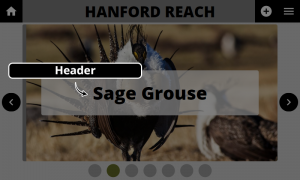
Next, we can start to write the content needed for the Flash Card activity type. This activity type displays flash cards for the user, with a title on the front and a brief description on the back. More information about each card, with full rich text markup, can be opened in a full screen pop-up. Using a carousel, the user can navigate through each card.
For this activity, we can copy the template for Card 1 and create as many duplicates as we need to have enough flash cards. For each card, we are required to have a title and a brief description. Adding an image preview for the card, as well as a full rich text description, are optional.
Coding the Activity
The next step will be to take the content that was created in the Content template and begin to migrate it into the Configuration template. We will need to open the provided Configuration Template for drafting the Flash Cards activity. This can be done in a plain text editor, but for the purpose of this manual we will be using jsoneditoronline.org/.
Now, we will be duplicating the necessary fields to ensure that we can enter all of the data that we’ve spent time drafting. In our previous example, we decided to use two flash cards for our activity, so we should start by making sure we have two flash cards within the configuration file.
The first card within the activity is labeled as ‘1’, underneath the Content object. If we click on the small box to the left of ‘1’, we can choose to duplicate it as many times as we need to create enough cards.
We have two slides we would like to add to the activity in total, so we will need to duplicate this field once. After this is done, we will need to rename the fields we just duplicated. Currently, it will be named “1 (copy)”. It is important that these keys be numeric and unique. We will rename it “2”.
We can now begin filling out the empty fields for each flash card. Under the first card, named “1”, we have the same information we entered into our content draft; Header, Image, and a Description object, containing the brief and full description.
We can copy the Title for our first card into “Header”, the location for our image into “Image”, as well as our brief and full rich text description into “Brief” and “Full”, respectively. We can do this for both flash cards, using the information from our draft.
Once you are finished, you can download the finished JSON file by clicking ‘Save’ and then ‘Save to Disk’. This file can be copied to the Program’s @Activity folder, and the media can be copied to the Program’s @Media directory.
Options
Flash Card Configuration
These are configuration settings for each flash card in this activity.
| Property | Description | Expected Parameters | Examples |
|---|---|---|---|
| Header | The title that is used on the flash card. This is displayed on the front and back side. | Plain Text | |
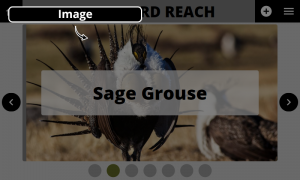
| Image | The background image that is used from the front side of the card. | Image File | |
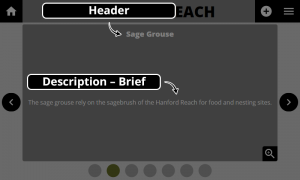
| Description – Brief | This is the short description that is shown on the back side of the flash card. | Plain Text | |
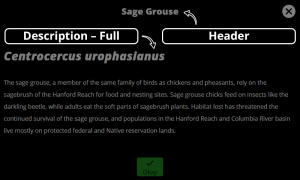
| Description – Full | This is the full rich text description that will show in a Look Closer pop-up when the user clicks on the Look Closer Button. | Rich Text |
| Documentation | |
|---|---|
| Installation | Look and Feel |
| Interaction Modes | Developing Activity Types |
| Creating an Interactive | Framework |
| Integrating CLIO | Contribute |


