Updating the POP Kiosk
Overview
After we have our kiosk up and running, we can begin to update the content we display on the kiosk. This can be done through a USB flash drive on the kiosk itself, attaching the SD card to another computer, through SSH after internet connectivity has been enabled, or locally using a keyboard to access the terminal.
Development Methods
CLIO Developer Mode
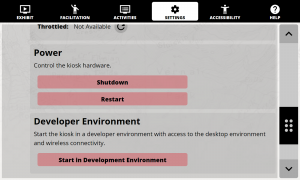
If you are using the CLIO Quick Start Image, you can use the CLIO web interface to enable the Development Environment. While in this mode, CLIO will no longer run in kiosk mode and the desktop environment will be enabled.
The Chromium browser can be minimized by swiping down from the top of the screen or hovering your cursor near the top. Click the small close button that appears. This allows access to the file manager and terminal so content can be copied over from a flash drive inserted through the maintenance panel.
Access the SD Card
The SD card can be removed from the kiosk and plugged into another computer. On Windows and MacOS systems, this will only mount the boot partition by default. This allows access to the boot/config.txt file which can configure some Raspberry Pi settings on startup. The SD card contains another Linux hard drive partition that isn't innately supported by Windows or MacOS. Linux-based operating systems will be able to read both partitions out of the box.
Accessing the Linux partition on Windows can be achieved using the Windows Subsystem for Linux (WSL) that is available for Windows 10 and later. There are also many dedicated, paid software packages that can edit files on these partitions. MacOS can access Linux partitions using open-source software like MacFUSE with the ext4fuse extension.
Connecting with SSH and VNC
While the kiosk is connected to ethernet or wireless connectivity has been enabled, it is possible to connect to the computer system remotely through SSH and VNC. Wireless connectivity can be configured through the boot/config.txt file or the Raspberry Pi Imager during the SD card flashing stage. The kiosk can be connected to using its IP address or the local hostname which defaults to raspberrypi.local. The default account is root and the default password is cliomuseums. We highly recommend changing this password with the command sudo passwd root once you get connected.
Kiosk Terminal
Attach a keyboard to the kiosk through the maintenance panel. By pressing Control + Alt + F2 you can open a root terminal. From here, you can do run whatever commands are necessary. Pressing Control + Alt + F1 will return you to CLIO Exhibit and Control + Alt + F3 will display a loading screen.
Updating CLIO Exhibit Content
If you are using your POP Kiosk to run CLIO Exhibit, you can access the content with any of the above methods. CLIO Exhibit can be updated by changing files in the web server directory.
| Documentation | |
|---|---|
| Installation | Look and Feel |
| Interaction Modes | Developing Activity Types |
| Creating an Interactive | Framework |
| Integrating CLIO | Contribute |
